9 steps to optimize your Webflow site for speed & performance

Key Takeaways
- A fast site isn’t just nice to have – it impacts SEO, conversions, and overall user experience.
- Test with tools like Lighthouse or PageSpeed Insights to identify speed issues before fixing them.
- Start with general optimizations inside Webflow: minify code, compress images, reduce unused styles, and optimize fonts.
- Go further with advanced optimizations: async/defer scripts, delay third-party scripts via GTM, and move non-critical scripts to footer.
- Optimize heavy assets like videos and Lottie animations by compressing and lazy-loading.
- Regularly measure your Core Web Vitals (FCP, LCP, CLS, TTI, TBT, Speed Index) to guide improvements.
- Speed optimization isn’t one-time – it’s an ongoing process of test → optimize → test.
So, you built a website. It looks great, has amazing animations, and works on every device. The only problem? it’s SLOWWWW.
But does 4 seconds of load difference even matter? Turns out, it does, and here’s why -
- Your users are impatient - Most users don’t want to wait for the website to load in 8-10 seconds, and they don’t care if it’s the greatest website if they can’t access it right now.
- A slower website means a lower ranking - Even Google likes fast websites. A site’s ranking can go down if it doesn’t perform well in the Core Web Vitals.
- Change in conversion rates - Portent’s study showed that a website loading in 1 second gets up to 3x better conversion rates when compared to a site that loads in 5 seconds.
In this blog, we’ll help you understand what makes your website load slow, how you can pinpoint issues in your website, and most importantly, how you can optimize each area of your website to ensure it has peak performance.
Let’s start from the basics.
What slows down your Webflow website
To improve your website speed (and ensure it’s always optimal), you must understand what causes your website to slow down in the first place.
Webflow already has some great built-in features to optimise the website for speed, but how you build and use Webflow still becomes a major factor behind how it performs.
There are many reasons why your website could be loading slowly. Some of the common ones are large image files, excessive JS and CSS, unoptimized fonts, third-party integrations and heavy animations or interactions.
You can find out the exact reasons for your website’s increased load time with some very simple tests.
How to measure your site speed
When it comes to measuring your site’s speed, there are multiple tools that you can use, including
Google Lighthouse, Page Speed Insights, GT Metrix and Pingdom.
For the ease of testing within the Chrome browser, and getting close to real-world load conditions of a website, we prefer testing with Google Lighthouse.
Let’s show you how you can measure your site’s speed in just a few clicks.
Step 1: Open Chrome and Your Website
- Start Google Chrome.
- Go to the webpage you want to check.
Step 2: Get to the Lighthouse Tool
- Right-click on the page and choose "Inspect," or use
Ctrl+Shift+I(Windows) orCmd+Option+I(Mac) to open the developer tools. - Click on the 'Lighthouse' tab, which you might find under the '>>' if it's not immediately visible.
Pro Tip: Always test your website in Incognito mode to prevent browser extensions from affecting the score.
Step 3: Set Up Your Test
- Pick what you want to test: Performance, SEO, Accessibility or Best Practices. You can also test all of them.
- Choose 'Mobile' or 'Desktop' to see how your site works on different devices.
Step 4: Start the Test
- Hit the "Analyze page load" button to begin the audit. Wait a bit while Lighthouse checks your site.
Step 5: Look at the Results
- Once done, Lighthouse will show a report. This includes scores and tips on making your site faster.
The score on “Performance” is what you want to see right now. The goal is to take this score as close to perfect as possible.
It’s important that you set realistic expectations based on how complex your website is and what kind of assets you have. A score of 90-100 is great, but you can stop at 70+ too.
This score is now calculated based on Google’s Core Web Vitals. Let’s look at what each of them means in 2025 –
- Largest Contentful Paint (LCP): This measures how long it takes for the biggest piece of visible content (like a hero image or heading) to load. Aim for under 2.5 seconds.
- Cumulative Layout Shift (CLS): This shows if your layout moves around while loading. Less shifting is better. A score under 0.1 is excellent.
- Interaction to Next Paint (INP): This replaced FID as the responsiveness metric. It measures how quickly your site reacts when someone clicks or taps. Under 200ms is considered good.
These three metrics give you a clear picture of whether your site feels fast, stable, and responsive. Keeping them within the target range will improve both user experience and your search rankings. If you want a refresher on the basics, check out our guide on Webflow SEO Basics.
Getting Started with the Optimizations
Now that you understand what’s causing your website to load slowly, we can start optimizing those areas to improve performance.
we’ve divided these optimisations into 2 categories
- General Optimizations - These are beginner-friendly tweaks that will help you boost your speed without touching additional codes or scripts. You can do most of them directly within Webflow, or using minimal external tools
- Advanced Optimizations - This involves a little more hands-on experience working with custom code and scripts. But don’t worry, we’ll guide you step by step on each optimization and also attach additional resources that you can go through to learn more.
General Optimizations
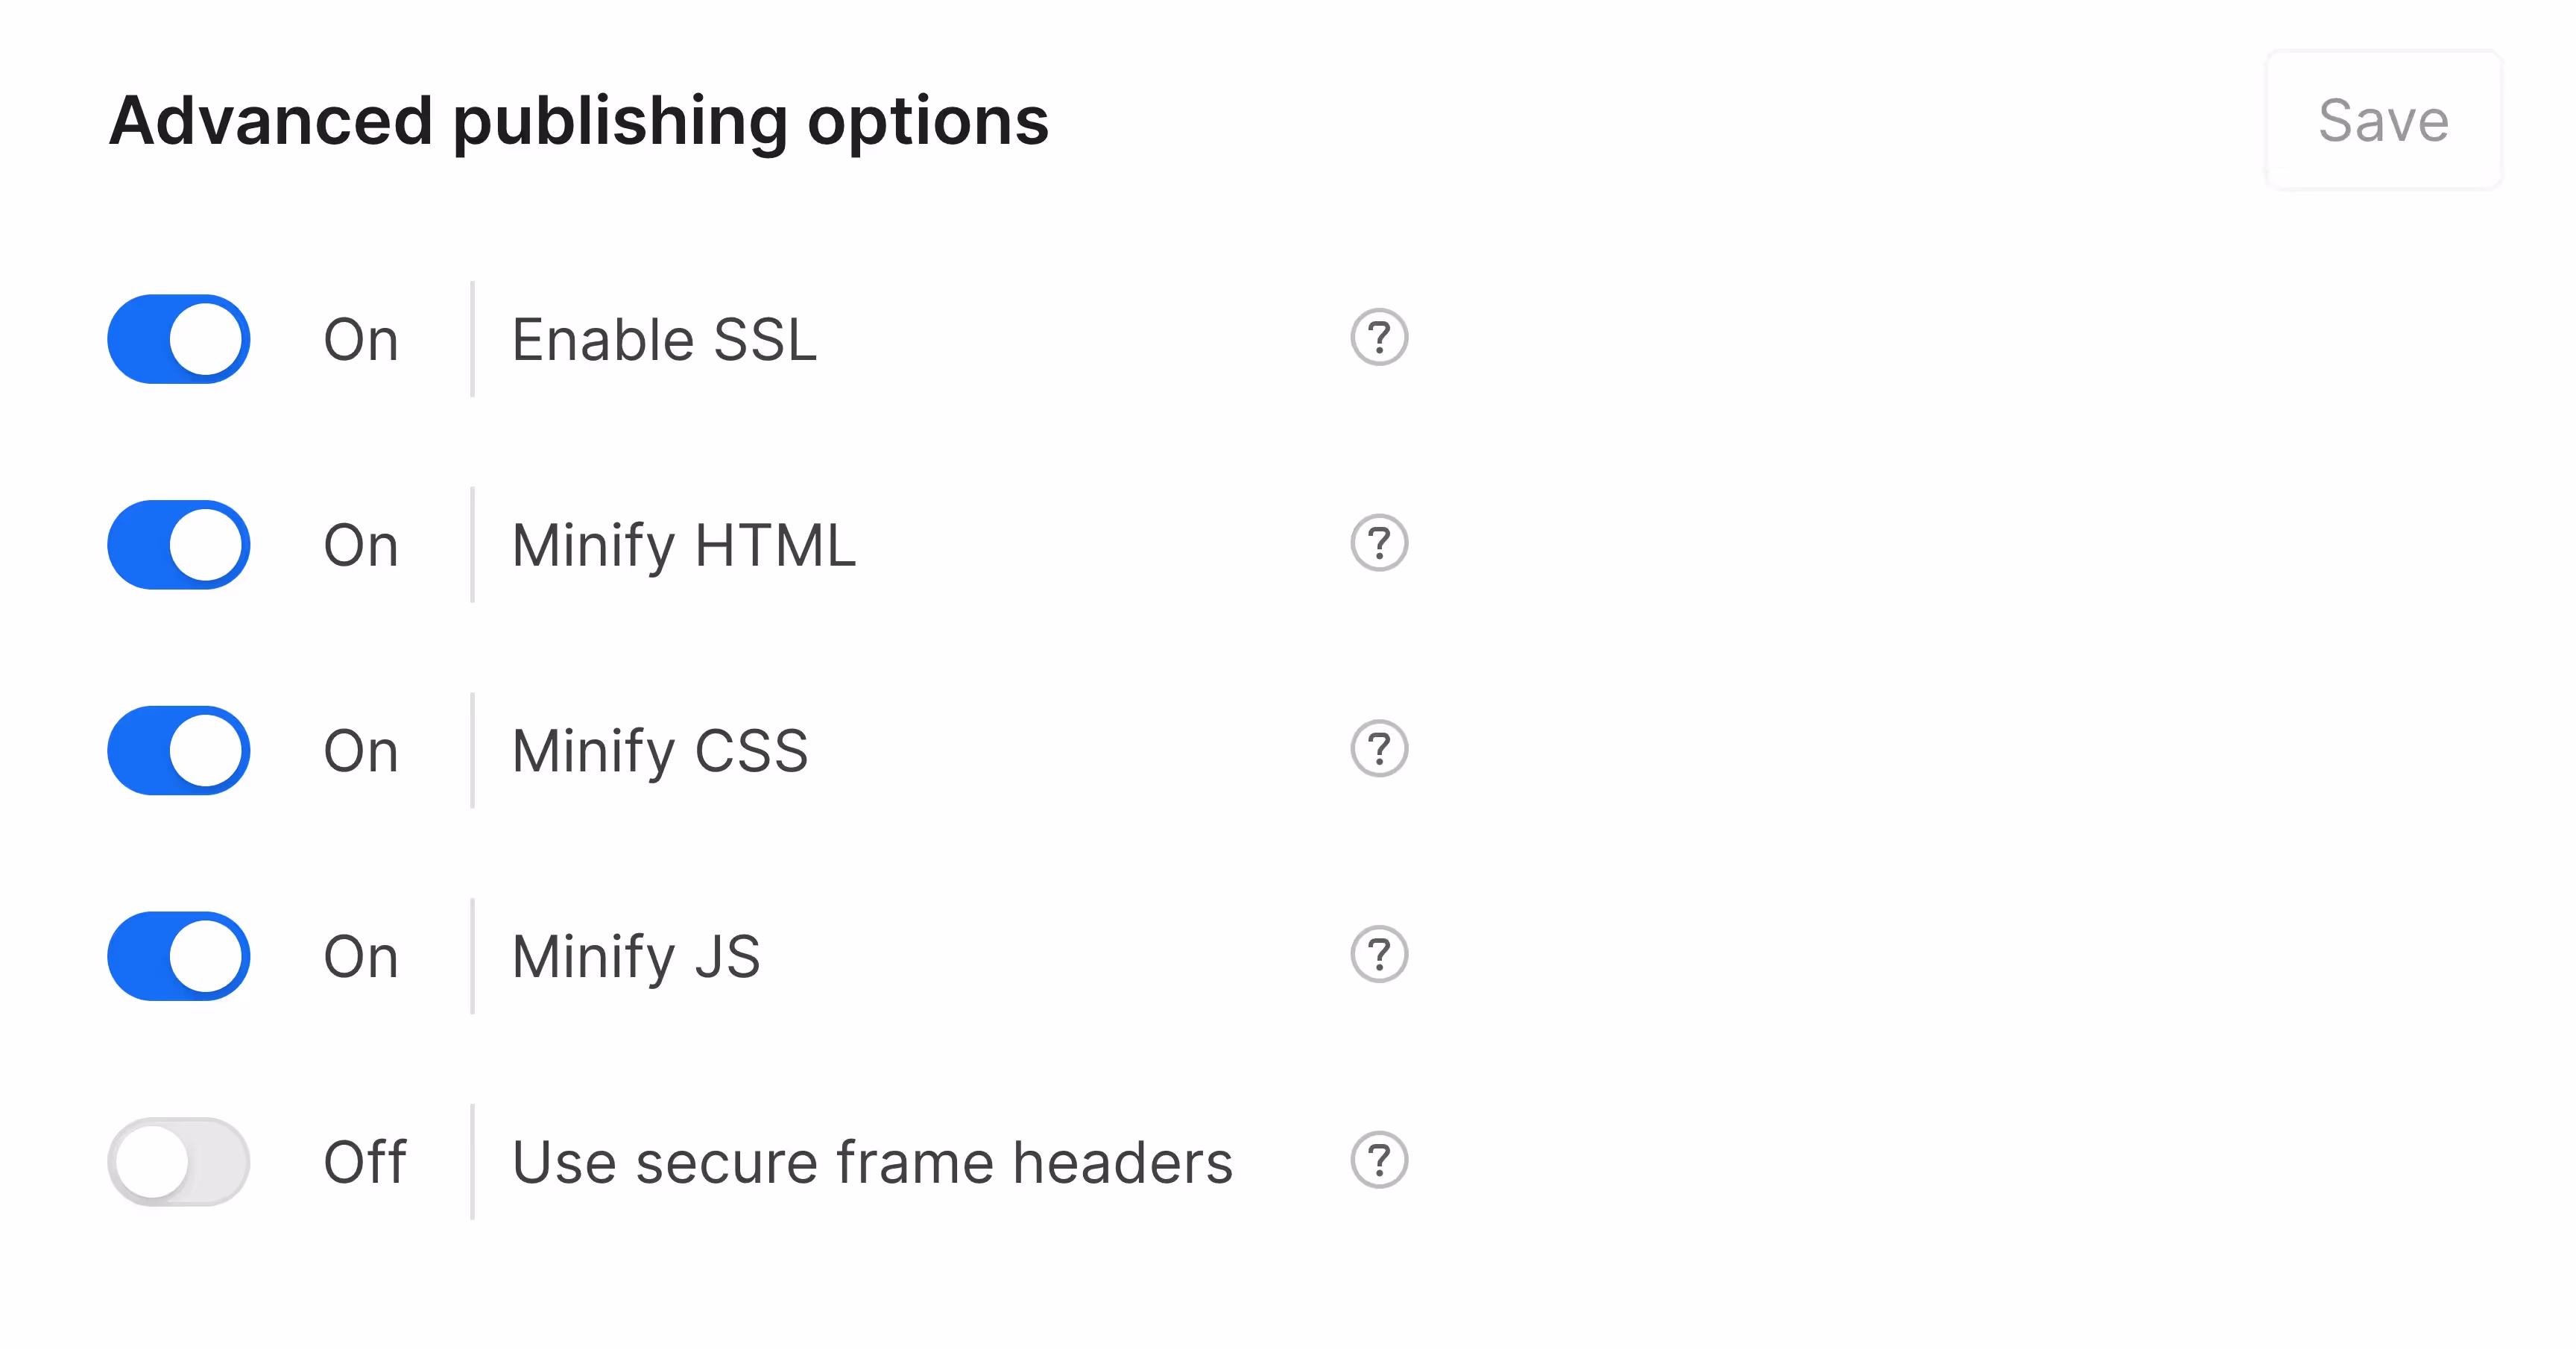
1. Minify HTML, CSS, & JS
This impacts performance metrics like First Contentful Paint (FCP) and Time to Interactive (TTI). Minifying HTML, CSS, & JS makes your website's code smaller by getting rid of extra stuff like spaces and lines that aren't needed. As a result, it reduces the website’s file size and helps it load faster.
How to do it in Webflow:
- Open Project Settings: Log in to Webflow, click on the three dots in the bottom right of the project, and hit 'Settings'.
- Find Publishing: Click on the 'Publishing' tab in the settings.
- Turn on Minify: Look for 'Advanced publishing options ' and you'll see options to toggle on HTML, CSS, and JavaScript Minification. Turn on all 3 of them to start this process.
- Update Your Site: Click 'Publish' to update your site with these changes.
2. Optimize Images
Images take up a lot of space and can have a big impact on your website’s load speed, affecting metrics like LCP and Speed Index. Large, unoptimized images can slow down these metrics, leading to a sluggish website. Here’s how you can optimise every time of image on your website.
2.1 Set explicit width & height values on images
When you don’t set explicit width and height for images, browsers can't reserve space until images load. This causes layout shifts and affects the Cumulative Layout Shift (CLS). It is also an overall poor user experience for your users.
Define explicit height and width for your images, so the browser can allocate space to them in advance.
2.2 Lazy load images
Loading all images at once, especially on a website with a lot of images, can slow down the page load times. To solve this, lazy load all the images that don’t need to be seen immediately on load.By default, Webflow sets all images on lazy load.
2.3 Use SVGs and SVG embeds
For things like logos and icons, SVGs are great because they're small in size and keep their quality at any size.
Also, use SVG embeds for graphics that need to interact or animate quickly, for example in buttons or menus. Putting SVG code right into your website's code helps it load faster because your browser doesn't have to fetch each image separately.
Pro Tip: You can even compress your SVGs by up to 80% with SVG compressors like Vecta.io, iloveimg.com, and SVGOptimiser.com
2.4 Compress PNGs/JPGs.
Large PNG and JPG files need more bandwidth to download, which results in increased load time. It’s always a good idea to compress your images before uploading them.
You can use tools like this from websiteplanet(up to 50mb file size) or TinyPNG to compress images in bulk.
Pro Tip: You can also compress your images and convert them inside Webflow itself. Just select the images in the asset panel (press J), and hit ‘Compress’ from the options at the top.
2.6 Avoid Uploading images as backgrounds on divs
Webflow uses responsive images, meaning it automatically scales or compresses images based on your screen size, to improve load speed. But this benefit doesn’t work on images that you upload on divs.
You can also not set lazy load on these divs, which further leads to larger load times.
So try to avoid uploading images on divs. Instead, use image elements.
3. Optimize Fonts
Using many custom fonts increases the total load time of the website, especially if they have multiple styles and weights.
Each font you use requires a separate file to be downloaded by the browser. So the more fonts you use, the more time it takes. While you can use the default browser font to solve this, that’s not ideal for most websites you build.
Here’s how you can make sure the website loads fast even with some additional fonts:
3.1 Reduce the number of fonts used
The first step here is to remove any unnecessary font style and weight that you uploaded to Webflow, but aren’t using. Keep only the font weights and styles that you actually use. For example, if your design doesn’t need ultra-light or extra-bold weights, don’t include them in your font files.
3.2 Avoid using fonts directly from Google Fonts
When you use Google Fonts directly, each font or font style used from Google Fonts requires an external HTTP request to Google’s servers. These additional requests increase the time it takes for a page to load.
Using Google Fonts has another big concern: breach of privacy. When you have Google Fonts installed on your website and someone visits it, Google logs their IP Address without their permission. European Union considers this a breach of privacy regulations.
So unless you want to pay the fine for GDPR non-compliance, avoid using fonts directly from Google. (Read more about GDPR compliance here.)
Instead of this, download the fonts you need from Google Fonts’ library, and upload them manually on your Webflow Project.
But don’t do this before you’ve converted your fonts to WOFF2. This brings us to our last point on optimising fonts.
3.3 Always convert your font to WOFF2
WOFF2 compresses the font file, meaning it’ll now take up much less space, and help you achieve that faster load time we’ve been working for.
It is also supported on most modern web browsers, so you won’t have to worry about your fonts not loading properly.
You can use tools like cloudconvert.com and fontconverter.io to convert your fonts in bulk.
3.4 Set Font Display to Swap
Some browsers delay the display of text until the custom font is fully loaded. During this time, the text area becomes blank, also called "flash of invisible text" (FOIT).
You can avoid this by setting your font display settings to “swap”. This will make the browser display text immediately with a fallback font until the custom font loads.
%20(1).avif)
You can learn more about font display settings in Webflow here.
4. Optimize Lottie
Lottie animations are efficient for complex animations but can still affect load times, if not optimized. To reduce their size, you can compress your Lottie JSON files on the LottieFiles compression tool.
You can also set a Lottie animation to start only when it’s visible in the viewport. This improves the Time to Interactive(TTI) since it reduces the browser's workload during the initial loading phase.
Lastly, if your Lottie animations are rather simple and have only one element being animated, consider using SVGs with a CSS animation instead. Simple animated SVGs are often lighter than Lottie animations, and your browser won’t need to load a library to run it.
Pro Tip: You can also animate your SVGs in SVGator and embed them in Webflow directly, making it a lighter and better alternative to Lottie animations for simpler stuff.
5. Clear Unused Interactions & Styles
Keeping unused styles and interactions in your Webflow project adds up to the CSS & Javascript files, leading to unnecessary bloat and not to mention the complexity when building the website.
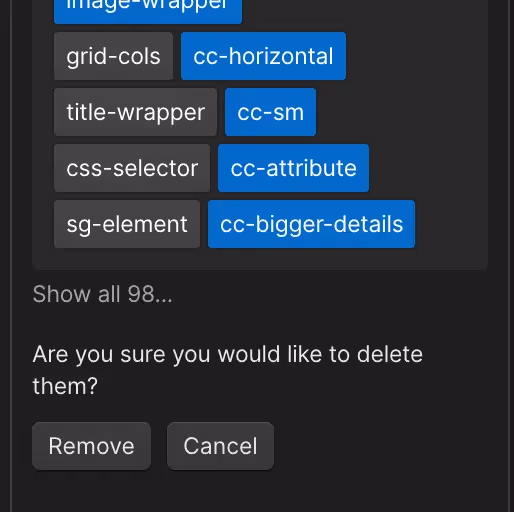
5.1 Remove Unused Styles
- In your Webflow designer, open the style manager panel and locate the style selector (or press G)
- Click on the broom icon in the top right corner to see the list of styles that aren’t being used on any page elements.

- Click on the ‘remove’ button at the bottom to clear it up.
5.2 Remove Unused Interactions
- In your Webflow designer open the interactions panel (Press H).
- Click on the broom icon in the top right corner to see the animations that aren’t being used anywhere on the project.
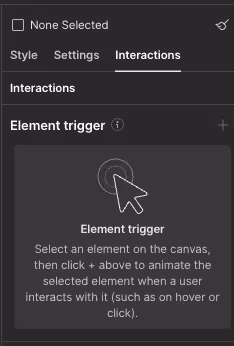
- Select the ones that you want to remove, and click on ‘Delete’ to remove them from your project.
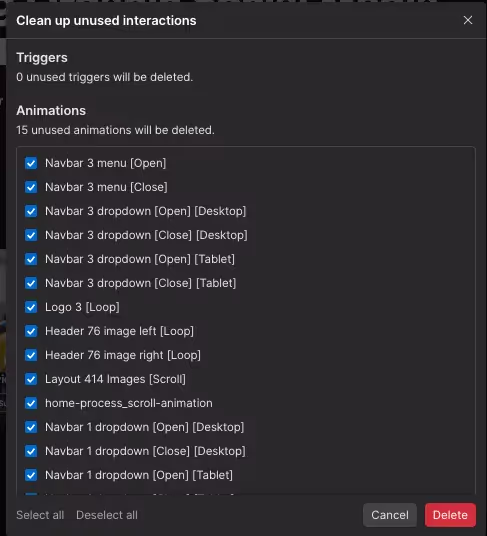
Clearing these up will remove any unnecessary bloat from your website, and improve Speed Index, Page Load Time, and Time to Interactive (TTI).
6. Optimize Videos
Videos are one of the largest contributors to slow-loading pages since they consume a lot of space. There are a few things you can do to optimize them to speed up your website.
6.1 Compress and convert
Compress your videos with tools like Veed.io and freeconvert.com before you upload them on Webflow.
6.2 Limit Autoplay:
Avoid auto-playing videos if not necessary, as they consume data and processing resources immediately as your page loads.
6.3 Convert to WebM
Converting videos to WebM can help you significantly reduce the file size, while still keeping high quality. You can use tools like CloudConvert and FreeConvert
7. Avoid Preloading or use Selective Preloading
Preloading pages or external links needs your browser to load more resources than you need at once. This increases the Time to Interactive (TTI) and First Contentful Paint (FCP).
To avoid this, only preload the most critical assets needed for the immediate view or interaction on the homepage. Avoid preloading large files or entire pages that are not needed right away.
Advanced Optimizations
Now that we’ve done the general optimizations, your website should already be loading significantly faster. Let’s take it up a level, and make some optimizations to improve it further.
1. Optimising third-party scripts:
Each third-party script often requires a separate HTTP request to get the script from another server. The more the scripts, the longer the wait time to get them all.
Many of these are also render-blocking, meaning the browser needs to load and execute them before it can continue rendering the rest of the page.
While you can’t 100% avoid all third-party scripts, you can optimise them so they load only when we need them to.
Here’s how you can optimize scripts for performance -
1.1 Use Async and Defer
Using async and defer attributes in script tags helps manage how and when JavaScript files are loaded and executed, which can significantly impact your website's performance.
async lets you load the script asynchronously with the rest of the page. This means that the script will be downloaded in the background and will execute it as soon as it is downloaded, without waiting for the entire page to load.
To load a script asynchronously, add ‘async’ after opening the script tag and before src.
<script async src="analytics.js"></script>defer on the other hand executes the script only after the HTML document has been fully analyzed. Like async, defer also downloads scripts in the background, but will only execute them once the document is completely ready.
To Defer your scripts, add ‘defer’ after opening the script tag and before src.
<script defer src="dom-manipulation.js"></script>Choosing Between Async and Defer
- Use
asyncwhen the script is independent and doesn’t rely on other scripts or DOM elements. It’s great for scripts like Google Analytics that don’t affect the display or behavior of the webpage. - Use
deferfor scripts that need to interact with the DOM or depend on other scripts loaded in order. This ensures they run in the correct order and only after the page has been processed. Usedeferfor scripts like website widgets, form validation, or scripts that use jQuery to manipulate DOM elements.
1.2 Delay scripts with GTM
Google Tag Manager(GTM) can be a great tool to help you manage your scripts and tags without having to modify the code directly. With GTM, you can delay the loading of certain scripts until after the initial page load, which can improve performance metrics like FCP and TTI.
Read more on how you can play around with GTM to optimize page speed here.
1.4 Move scripts from head to footer
Your browser reads your web page from top to bottom. Having render-blocking scripts in the <head> section can block the browser since it needs to read and execute those scripts before continuing.
After processing the head, the browser moves to the <body> section where all the visible content is defined.
Moving scripts to footer will allow the browser to load and render the main content of the page before dealing with these scripts, thus improving the page speed.
But before moving every script from head to footer, consider the following:
- Essential for Initial Load: Some scripts are needed for the initial rendering or functionality of the page (like scripts setting up the initial layout or functionality). Moving these to the footer could break the page's functionality as they might execute too late.
- Dependencies: If a script in the footer relies on another script that was originally in the head, you need to maintain the correct order to prevent dependency-related issues.
Once you’ve moved the scripts, rigorously test the website to ensure that everything functions correctly. Check that interactions, styles, and features to make sure they work as intended.
2. Use CSS animations wherever possible
CSS animations are generally more performance-efficient than JavaScript animations, especially for simple transitions and effects. Using CSS animations instead of JS animations can improve your FCP, TBT and TTI. This needs a little more code knowledge, but you can always use AI tools like ChatGPT or ClaudeAI to help you with it.
You can build CSS animations for text slide-ins or fade-ins with just a few lines of CSS, and use them on multiple areas on your website with custom attributes.
For example, a simple fade-in animation would look something like this:
[fade-in] {
	animation-name: fadeIn;
	animation-duration: 2s;
}

@keyframes fadeIn {
  from { opacity: 0; }
  to { opacity: 1; }
}
To create a CSS animation, add the code given above in an embed. Select the element you want to animate, then go to the custom properties under the settings panel. Set the “animation-name” to “fadeIn” and set the “animation-duration” to whatever you prefer.
That’s it, your simple fade-in animation is ready. You can learn more about CSS animations here.
Test > Optimise > Test
Congrats! Your website should be loading much faster now. Remember to test at each step of your optimization phase. Keep publishing after you’ve optimized some parts to see how you are progressing.
Once you are satisfied with the load speed and performance score, you can stop further optimization and go for the launch.
Use these steps in your future projects as best practices, so your website is already optimized for speed by the time you’ve fully built it.